
I used the cluster set up to create the blendshapes I needed. Looking at various tutorials, I found that the best way to do an eye blink blendshape was to also do in between shapes so that the eyelid rotates correctly around the eye rather than just passing straight through it to get to the final position. As I already had set up the clusters, it was very easy to just position the eyes how I wanted them then duplicate the mesh at that position. I made three in between shapes, plus the final closed position, making four in total for each eye. To set up a blendshape correctly with the in-between shapes, it is important to select them in the right order.
First select the in between shapes in order. So 1/4 closed, 1/2 closed then 3/4 closed.
Second select the final closed position.
Lastly select the deafult, main mesh.
Then go to create deformer and open up the blendshapes options. Check the In-between box, hit create.
Now when you open up your blendshapes, you should have a nice smooth blink.
To add the other eye, first select the closed position, then select the main default. Go to Edit deformers, blendshape, add. This will add the second eye blink to the list of blendshapes, but without the in-betweens. You need to add them after. For each in between, select it first, then the default and go to edit deformers, blendshapes and open up the options for add.
Check the add in-between target checkbox and type in the index number (if this is the second blendshape you've added, this number will be 2, third will be 3 etc). Next type in the in between weight value.
1/4 closed will be 0.25
1/2 closed will be 0.50
3/4 closed will be 0.75
As long as you put in the correct values for each inbetween, theywill be in the correct order.
Thursday 26 November 2009
Monday 23 November 2009
Baboon Rigging
After lots of trial and error on Pete, rigging and skinning the baboon only took about a day! I rigged him in the T position as he will need to both run like a quadruped and stand like a biped, he will also need the use of his hands. As his arms are longer than his legs, running like a quadruped shouldn't take a specialised rig.
I've decided against the use of blend shapes as there is very little dialogue. Instead, I will be using the method of 'facial rigging'. For the baboon I will create joints for the jaw and the eyebrows. For Pete I will do his jaw using joints and his eyelids using clusters. For each of these I will create controllers, linked by driven keys or parenting, that are easy to use and clear as to what they do.
Eyebrow controllers...
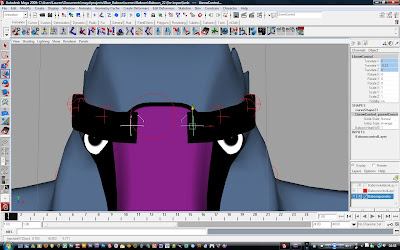

Inside the eyebrow is a joint (separate to the main rig). The eyebrow is connected to these joints by a smooth bind. Parent constrained (translation only) to each joint is a controller. These controllers are in turn parented to the head joint so that they move correctly when using the head squash and stretch. The head squash and stretch is another useful feature of the auto rig. :)
To test the rig I made a run cycle. Which pointed a few problem areas out which I went back and fixed.
I think the movement looks correct but it's perhaps a bit slow for a run.
Pete setbacks
When testing Pete's rig, lots of things were going wrong, earlier in the rigging process I'd deleted some of the controllers as they didn't seem to do anything. now I discover that they were to do with proper rotation of the back. Also the model wouldn't scale or rotate properly by using the main controller. his head would stay in one position while the rest moved. I knew the rig was capable of uniform scaling as I could scale the baboon, but something was definitely wrong with Pete's rig.
I decided the best method would be to delete the rig and re-do it. Though I wasted a day on this, I don't mind as it means I will have a stable and reliable character to work with while animating. The skin weights are also improved as my work flow is a lot more efficient now I've had a lot of practice. Before re-skinning I will work on blendshapes for pete's eyes as my previous cluster method doesn't work.
I've decided against the use of blend shapes as there is very little dialogue. Instead, I will be using the method of 'facial rigging'. For the baboon I will create joints for the jaw and the eyebrows. For Pete I will do his jaw using joints and his eyelids using clusters. For each of these I will create controllers, linked by driven keys or parenting, that are easy to use and clear as to what they do.
Eyebrow controllers...


Inside the eyebrow is a joint (separate to the main rig). The eyebrow is connected to these joints by a smooth bind. Parent constrained (translation only) to each joint is a controller. These controllers are in turn parented to the head joint so that they move correctly when using the head squash and stretch. The head squash and stretch is another useful feature of the auto rig. :)
To test the rig I made a run cycle. Which pointed a few problem areas out which I went back and fixed.
- I hadn't parented the jaw controllers to the head control, so while they moved with the main controller, they didn't move when rotating or translating the head.
- I hadn't parented the tail controllers to the pelvis control. so while they moved with the main controller, they didn't move when rotating or translating the pelvis.
- I hadn't parented the butt correctly so it wouldn't scale uniformly with the rest of the model using the main controller.
- The neck creased when rotating ans translating it up and back so I smoothed out the skin weights a bit more there.
- I hadn't frozen the transformations on one of the eyebrows so it could not be easily set back to its default position, I had to remove the constraints to the head joint temporarily and put them back after freezing.
I think the movement looks correct but it's perhaps a bit slow for a run.
Pete setbacks
When testing Pete's rig, lots of things were going wrong, earlier in the rigging process I'd deleted some of the controllers as they didn't seem to do anything. now I discover that they were to do with proper rotation of the back. Also the model wouldn't scale or rotate properly by using the main controller. his head would stay in one position while the rest moved. I knew the rig was capable of uniform scaling as I could scale the baboon, but something was definitely wrong with Pete's rig.
I decided the best method would be to delete the rig and re-do it. Though I wasted a day on this, I don't mind as it means I will have a stable and reliable character to work with while animating. The skin weights are also improved as my work flow is a lot more efficient now I've had a lot of practice. Before re-skinning I will work on blendshapes for pete's eyes as my previous cluster method doesn't work.
Friday 20 November 2009
Run Baboon Run!
I've been looking around a lot at video's of baboons running to see what movements I'd need for 'Mr Tibbles'. I've discovered that there are two main poses in their typical run-cycle.

The major difference between a walk cycle and a run cycle in any character is that whilst running, there is a period of time where there are no limbs touching the floor. Essentially you hop from one spot to the other, shifting your weight from one foot to the other (or in the case of quadrupeds, jumping from the back legs to the front legs).
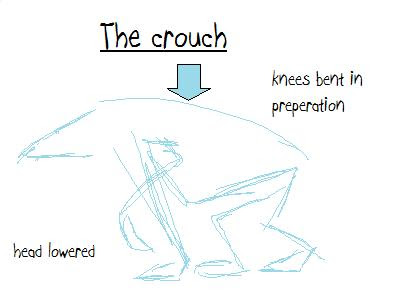
As with regular jumping, there is anticipation before the jump. This is the crouch, where the knees bend down in preparation for propelling the body forward. As the body shoots forward, the legs extend fully, pushing the rest of the body forwards and up. After this, there is a period of 'air time' where there are no limbs supporting the characters weight. The line of action is followed for a frame or two but then gravity takes hold, bringing the character back to the ground where there is a landing (arms first) in a pose that flows through to the crouch movement.
Generally when quadrupeds run, there is a slight offset between the movement of the limbs on the left and on the right. The faster they run, the lower the offset.
The faster the transition from crouch to leap and back again, the faster the animal will appear to run.
This baboon in an episode of Ren and Stimpy is so angry and is running so fast, that both poses merge together with virtually no in-betweens. While not a realistic approach, the humor and characterisation are benefited.


The major difference between a walk cycle and a run cycle in any character is that whilst running, there is a period of time where there are no limbs touching the floor. Essentially you hop from one spot to the other, shifting your weight from one foot to the other (or in the case of quadrupeds, jumping from the back legs to the front legs).
As with regular jumping, there is anticipation before the jump. This is the crouch, where the knees bend down in preparation for propelling the body forward. As the body shoots forward, the legs extend fully, pushing the rest of the body forwards and up. After this, there is a period of 'air time' where there are no limbs supporting the characters weight. The line of action is followed for a frame or two but then gravity takes hold, bringing the character back to the ground where there is a landing (arms first) in a pose that flows through to the crouch movement.
Generally when quadrupeds run, there is a slight offset between the movement of the limbs on the left and on the right. The faster they run, the lower the offset.
The faster the transition from crouch to leap and back again, the faster the animal will appear to run.
This baboon in an episode of Ren and Stimpy is so angry and is running so fast, that both poses merge together with virtually no in-betweens. While not a realistic approach, the humor and characterisation are benefited.
Wednesday 18 November 2009
Skinning and workflow issues
I'm having a hard time painting the skin weights on my characters, it's taking so long! Its a pity the auto-rigging script didn't have an auto skinning function too. :P
Its better now though than what it was. It seemed as though I was working at a two steps forward one step back pace. I painted the skin weights for Pete all over then had problems with the hips so I had to unbind the skin and reposition the joints to move the hips further down in the character. I also wanted to add a jaw to Pete's face to make blend shapes easier.
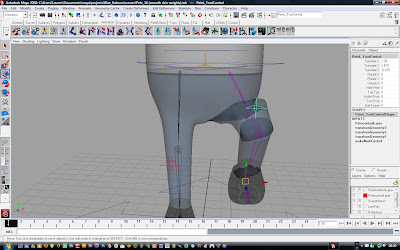
Even with the rough skinning you can see the problem between the legs. The hips too high up, giving odd deformation.
The problem with the paint skin weights tool is that if you use anything other than 'add' for your brush, you can't control where your influences are going. To be able to smooth influences and blend one joint to another, you have to 'hold' all the joints but the ones you're working on, otherwise you'll find Maya will add and remove influences from any random joint it feels like.
With the regular paint skin weights tool, there is no way to hold/un-hold all joints with one click so you have to click on each joint individually (and when your model has many many bones, this can be very time consuming).
To save on production time and make my life a little easier, I'm gradually customising Maya to meet my needs and improve my work flow. I looked for scripts that could improve on the skinning process. I found two that were very useful and added them to the animation shelf:
Heat-Weight
This script improves on the default skin weights that Maya assigns. It excludes all end joints (as most of the time they do not need weights to them), influences are better placed in relation to the joints and boundaries are automatically smoothed. It is not an entirely automatic script as there is still a good deal of tweaking to be done afterwards but it gives you weights that are a far better starting point.
Skinny
Skinny is an improvement on the paint skin weights tool where you can lock/ unlock multiple joints with just one click to hold their values while you work on other joints.
I also found a useful video about improving work flow when painting skin weights. A process of 'over-weighting' influences will prevent you from having to paint a joints influence more than once.
Finding and using these tools and methods took a good deal of trial and error and time, but now that I've found them and know how they work, it will vastly improve my work flow and overall production time on future projects. Also, if it can help others, that's a big bonus too :)
Revised Aim and Learning Objectives
Aims:
To create a 3D animation that holds the audience's attention from start to finish.
To find out how well 2D animation can be combined with 3D animation.
To design 2 different characters for animation that work well in both 2D and 3D.
To make the audience laugh and engage with the film.
To stick to a simple story but execute it in a complex way with the film language I use.
To use music and sound effects that compliment the action.
To add a piece of good quality character animation to my portfolio show reel.
Learning Objectives:
I want to further my knowledge in character design, modelling and animation, film language both in short and feature films and simple narrative construction.
I want to develop a working pipeline and time-saving work flow techniques that can be used for future CG projects.
I want to promote myself for future freelance work.
Sunday 15 November 2009
Rigging trial and error
As I wanted to produce decent character animation I needed a decent rig to allow the model to move to my needs. I found it frustrating that to translate my characters to animatable puppets, I would have to undergo the time consuming rigging process even though it is not rigging that I want to specialise in.
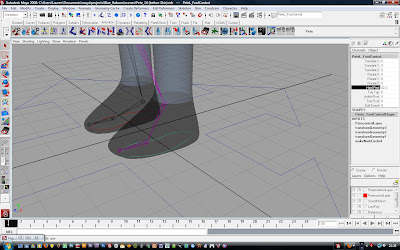
I tried to find tutorials that would allow me to rig fast but still retain the movement I required. I followed this "5 Minute leg rig". I found it fast to set up, but not with the automation I'm looking for. There is no foot roll, or any other functions which would make animation easier.

With the arms, the problem was not with the functionality, but with the time it was taking me to do just the one. I was following this multi-part video tutorial. It would have allowed for lots of movement with the animation but for the time it was taking, it wouldn't have allowed for much animation at all before the deadline.

So I decided to look for other methods. From importing a rig I'd made in a previous project and tweaking it to my new characters, to downloading somebody else's rig, to using a script to generate one for me. Looking back at the rig I'd made in a previous project, it was fairly basic and some of the movements were a bit odd. I was also unsure of how that rig or other rigs could be changed to fit my characters while still keeping their functionality.
In the end I stumbled upon a script that would, from a basic half-skeleton of joints, rig a character for you with all the necessary controls and high functionality. I tried it out on Pete and found the atomisation just what I was looking for. The arms and legs both have pole vectors plus all the easy to find controllers you would expect in a good rig. You can tailor the script to meet your needs, selecting and rigging a body part on onside of the character will automatically copy over to the other side. This is an amazing time-saving tool.

His foot controller has a foot roll (called heel peel), toe tap, ankle pivot, toe pivot and ball swivel.
All his finger joints have controllers in the channel box and driven keys for spread and cupping objects.

I tried to find tutorials that would allow me to rig fast but still retain the movement I required. I followed this "5 Minute leg rig". I found it fast to set up, but not with the automation I'm looking for. There is no foot roll, or any other functions which would make animation easier.

With the arms, the problem was not with the functionality, but with the time it was taking me to do just the one. I was following this multi-part video tutorial. It would have allowed for lots of movement with the animation but for the time it was taking, it wouldn't have allowed for much animation at all before the deadline.

So I decided to look for other methods. From importing a rig I'd made in a previous project and tweaking it to my new characters, to downloading somebody else's rig, to using a script to generate one for me. Looking back at the rig I'd made in a previous project, it was fairly basic and some of the movements were a bit odd. I was also unsure of how that rig or other rigs could be changed to fit my characters while still keeping their functionality.
In the end I stumbled upon a script that would, from a basic half-skeleton of joints, rig a character for you with all the necessary controls and high functionality. I tried it out on Pete and found the atomisation just what I was looking for. The arms and legs both have pole vectors plus all the easy to find controllers you would expect in a good rig. You can tailor the script to meet your needs, selecting and rigging a body part on onside of the character will automatically copy over to the other side. This is an amazing time-saving tool.

His foot controller has a foot roll (called heel peel), toe tap, ankle pivot, toe pivot and ball swivel.

All his finger joints have controllers in the channel box and driven keys for spread and cupping objects.

Friday 13 November 2009
Maya modelling


I used a box modelling method, using a sub div proxy to see how the smoothed model would look while working on a low res framework. By extruding faces, adjusting vertices and adding edge loops I could create the shapes I needed in line with the reference images.


With the modeling complete I mapped the uv's without unwrapping them to create simple blocks of colour.

The baboon was modeled in much the same way, using box modelling to get the basic shape then refining using the various polygon modelling tools.


I created the eyebrow separately by extruding a face along a curve, the same way I created the hair on Pete.

I just created two nurbs spheres for the butt. and parented them to the main body.

The pupils in the eyes are just a simple ramp shader.

I modeled the mansion/ castle by bridging between cylinders. The windows were then just deleted faces.

I extruded the edges of the windows and doors back into the castle to give them depth. As the castle will only be seen in its entirety from the front, and in silhouette from the back, I don't need to make any further changes.

Monday 9 November 2009
Baboon Re-design
Over this past week I've been modelling my characters on Maya. I made some alterations to the baboon design following last weeks tutorial. The main issues with the design based to the maquette were that the baboon's arms were too thick at the top, making him look more like a gorilla than a baboon. His face was the wrong shape for a baboon, looking more like an ant-eater with that long muzzle.
I had strayed away from the common characteristics of baboons:
Sunken eyes with a protruding brow
Big pink bum
Hairy
Skinny, long arms
Short tail
With this in mind and the comments from the tutorial I analyzed the design and began to make alterations.

I looked back to my first baboon design, which was well liked. Just paper cut-out shapes, not perfect, but still effective as a preliminary character design.

Combining these two designs and the characteristics of baboons, I altered my character design.

I had strayed away from the common characteristics of baboons:
Sunken eyes with a protruding brow
Big pink bum
Hairy
Skinny, long arms
Short tail
With this in mind and the comments from the tutorial I analyzed the design and began to make alterations.
I looked back to my first baboon design, which was well liked. Just paper cut-out shapes, not perfect, but still effective as a preliminary character design.
Combining these two designs and the characteristics of baboons, I altered my character design.
Tuesday 3 November 2009


Monday 2 November 2009
More Character Design
As I did with the Baboon, I tried out some different head shapes, this time trying to give them S and C curves.
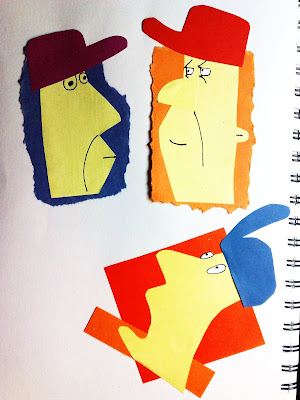

I then modeled a few shapes with the plasticine so I could visualise them all the way around.

I placed the shape into my Illustrator file to see if it could help refine the design.

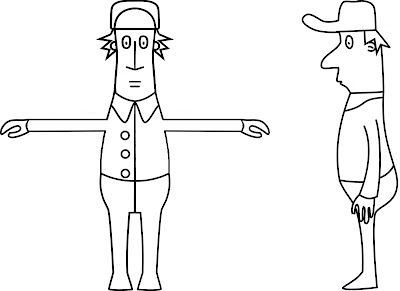
Still more tweaking in order, I needed to look more at the body shape. I like the shape of George Jetson's body so I used that as a starting point and tried some more shapes with the plasticine.

I like the long cap in this model and the overall shape- Lots of S's and C's


I placed these pictures into my illustrator file to use as a reference.

I think the neck looked too long

So I scaled it down and messed around with some of the curves to get a much cleaner result

I then gave him a neutral expression.
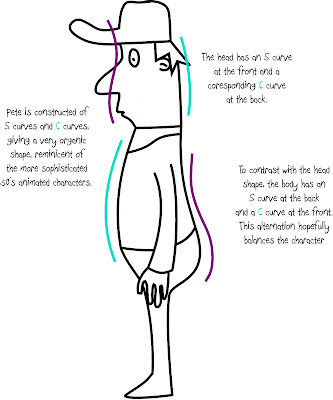
Explanation of the design in terms of curves


I then modeled a few shapes with the plasticine so I could visualise them all the way around.

I placed the shape into my Illustrator file to see if it could help refine the design.

Still more tweaking in order, I needed to look more at the body shape. I like the shape of George Jetson's body so I used that as a starting point and tried some more shapes with the plasticine.

I like the long cap in this model and the overall shape- Lots of S's and C's


I placed these pictures into my illustrator file to use as a reference.

I think the neck looked too long

So I scaled it down and messed around with some of the curves to get a much cleaner result

I then gave him a neutral expression.

Explanation of the design in terms of curves

Sunday 1 November 2009
It's all in the curves
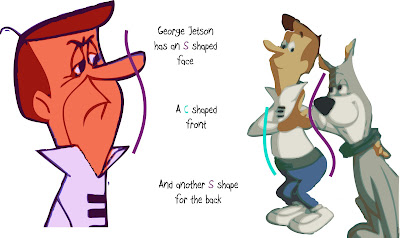
It's been noticed that a lot of characters in the 50's and early 60's (specifically male characters) have the same principles about them (I found this post to be very useful). I've been looking at character design in some of Hanna Barbera's human and humanoid characters and illustrating the basic curves that make up their construction. I want to apply the same Principle, organic curves to my Pete the Pet-Sitter character.


Subscribe to:
Posts (Atom)